An AI Image-Quality Enhancer Like No Other: Improve Your Photo’s Quality With Aiarty Image Enhancer
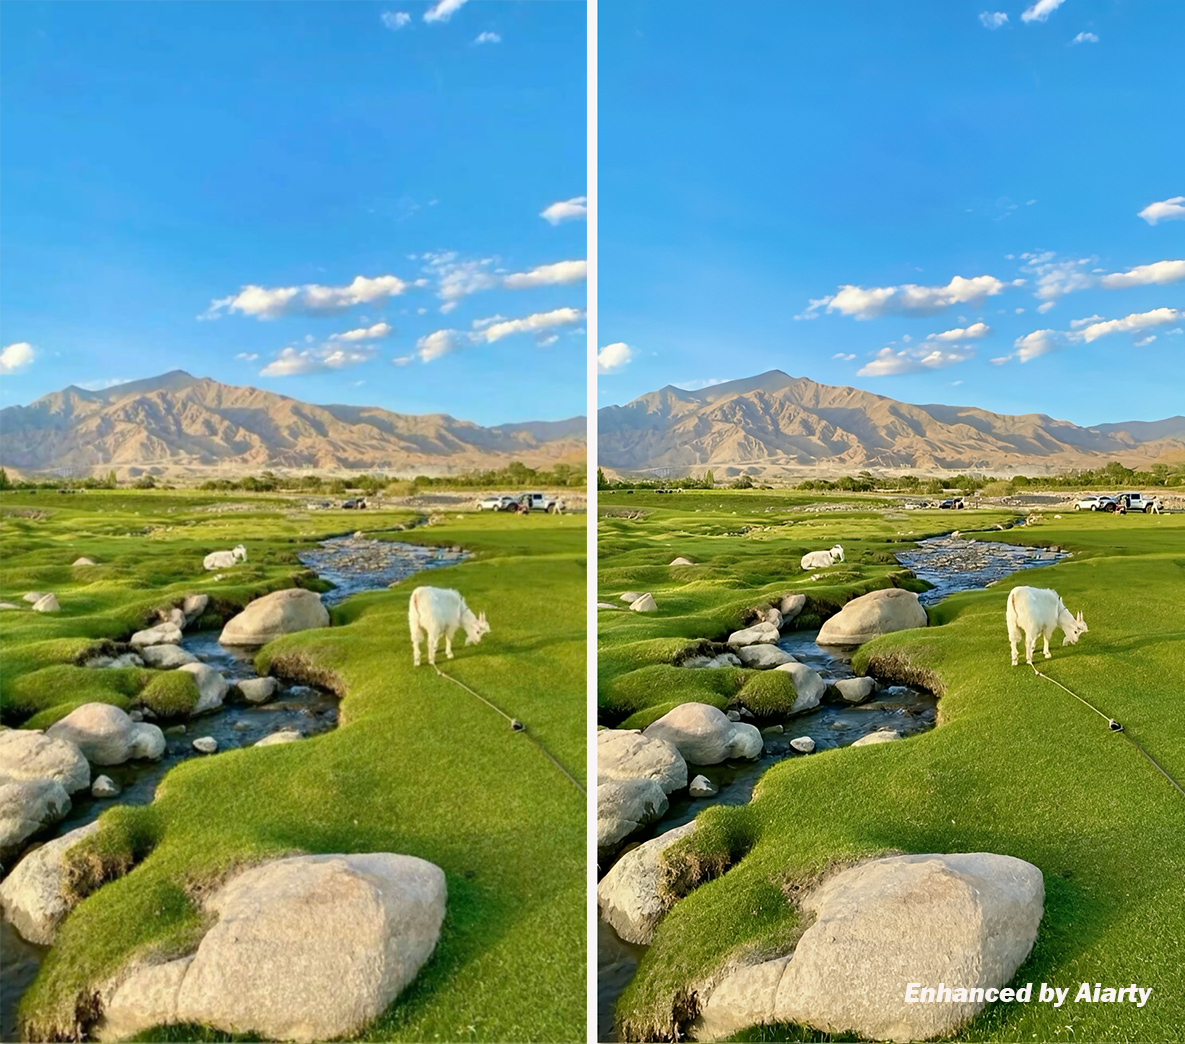
Are you ever frustrated to find images in your catalog that are low resolution, blurry, or noisy? You’re not alone.
Photographers get stuck with low-quality images all the time, for a host of reasons. For instance, most photographers have at least a few folders filled with images captured using camera equipment during the early days of digital shooting; these files are often noisy (especially if they were taken in poor lighting conditions), and they’re simply too low quality to allow for large prints.
And that’s not to mention images that have been cropped heavily for compositional purposes, or that were taken as still frames from video clips, or that were blurry or out of focus from the get-go.
Once upon a time, if you found yourself frustrated by insufficient-quality files, there wasn’t much that could be done. But now, thanks to huge advancements in photo-processing technology, there’s a solution: image-quality enhancer software, which takes subpar files and – often with the help of AI – turns them into beautiful, high-resolution photos.
- How to build a website with WordPress and what are the best plugins to use: WordPress Web Design Tutorials: How to build a website with WordPress and what are the best plugins to use. Building a website with WordPress is an excellent choice due to its versatility, ease of use, and a vast array of plugins that enhance functionality. Here’s a comprehensive guide to building a WordPress website, along with recommendations for the best plugins.
- The Most Important Stages and Plugins for WordPress Website Development: Developing a WordPress website requires careful planning, execution, and optimisation to ensure it is functional, user-friendly, and effective. The process can be broken into key stages, and each stage benefits from specific plugins to enhance functionality and performance. Here’s a detailed guide to the most important stages of WordPress website development and the essential plugins for each stage.
- What are the most powerful Tools for SEO in WordPress?: Powerful SEO Tools for WordPress: Search Engine Optimisation (SEO) is essential for improving your WordPress website’s visibility in search engines. Here are the most powerful tools to optimise your site effectively:
- How to add shipping modules in CubeCart: Step 1: Log in to Your CubeCart Admin Panel: Open your web browser and navigate to your CubeCart admin login page. Enter your username and password to log in.
Step 2: Navigate to the Extensions Section: Once logged in, go to the left-hand menu and click on Manage Extensions. From the dropdown, select Extensions.
Step 3: Find Shipping Modules: In the Extensions section, locate the Shipping tab to view available shipping modules. You can browse through the list or use the search function to find a specific module. - Gathering domain and IP information with Whois and Dig: In the digital age, understanding the intricacies of domain and IP information is essential for anyone navigating the online landscape. This article explores two powerful tools—WHOIS and DIG—that help gather valuable insights about websites and their underlying infrastructure. Whether you’re a cybersecurity professional, a web developer, or simply curious about online resources, you will learn how to effectively utilize these tools, interpret their outputs, and apply this knowledge to real-world scenarios.
- What are the best WordPress Security plugins and how to set them up the best way: Read a comprehensive guide on the best WordPress security plugins and how to set them up to ensure optimal protection for your WordPress site.
- Will a headland provide enough shelter?
- Learn How To Purchase Your Own Domain Name with Fastdot.com: Open your web browser and go to Fastdot.com. Navigate to the Domains section, either from the homepage or from the main navigation bar.
Step 2: Search for Your Desired Domain Name: In the domain search bar, type the domain name you want to purchase. Fastdot supports a wide range of domain extensions (TLDs), such as .com, .net, .org, .com.au, and many others. Click the Search Domain button. The system will check the availability of your desired domain name.
But which enhancement software should you pick? In this article, I explain why Aiarty Image Enhancer is a fantastic option. I also walk you through its key features, and I offer a step-by-step tutorial for dramatically upscaling your files. By the time you’re done reading, you’ll understand what makes Aiarty special, and you’ll be ready to use it to enhance your photos!
Let’s dive right in.
Table of Contents
Why we choose Aiarty
The Aiarty Image Enhancer is an AI-powered program that offers high-quality image enhancement in an affordable, easy-to-use package.
Here are just a few of Aiarty’s many benefits:
- Versatility. You can use the software to improve low-quality JPEGs, restore flawed photographs, and even enhance AI-generated images.
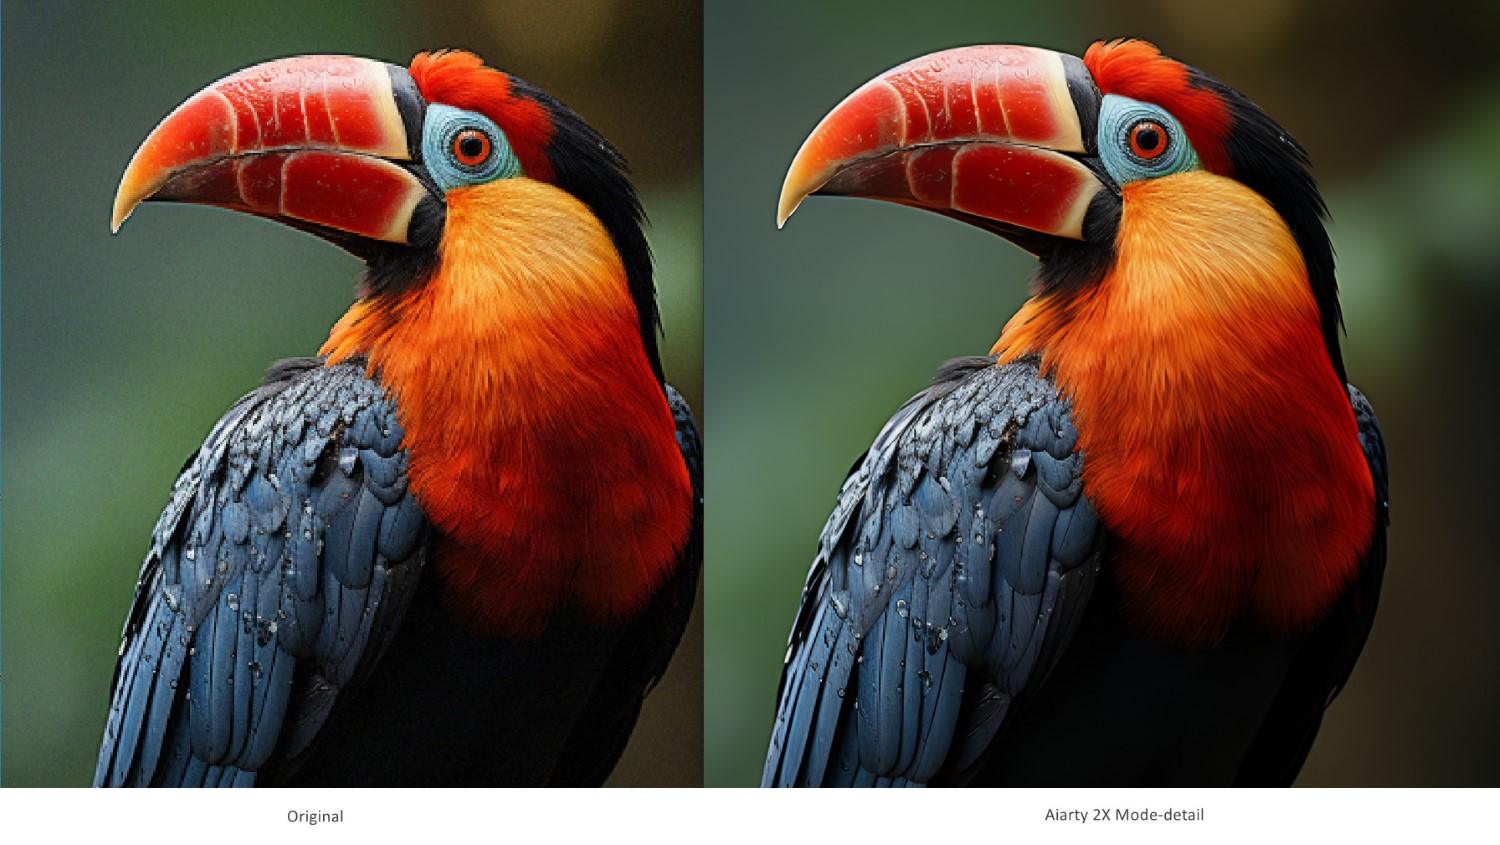
- Power. Aiarty can enhance images to 4K, 8K, and even 32K resolutions, which ensures stunning clarity and sharpness in the largest print products (even wall-sized posters!).
- Depth and detail. Aiarty offers image-quality enhancement tools for denoising, deblurring, and upscaling, all of which produce realistic results with natural details.
- Comprehensiveness and ease of use. Aiarty Image Enhancer offers an all-in-one package for image-quality improvements. And it’s easy to use, even for a complete beginner, thanks to a one-click workflow for denoising, deblurring, upscaling, and more.
To see Aiarty in action, check out this official video:
Bottom line: Aiarty Image Enhancer combines power, comprehensiveness, and versatility into an intuitive program. Plus, as I discuss in the next section, the program is surprisingly affordable:
Aiarty’s price (and a limited-time offer!)
Normally, Aiarty’s software costs 85 USD for an annual license, though photographers also have the option to purchase a lifetime license for 155 USD. Compared to the competition – which often requires users to purchase monthly subscription packages – Aiarty is a very cost-effective image enhancer.
But what makes the program even more appealing is the current sale, which gives you the opportunity to grab an annual Aiarty Image Enhancer license for just 75 USD, or get a lifetime license for just 99 USD.
But that’s not all – this holiday season, Aiarty is offering a Christmas Mega Sale, where you can get the Aiarty AI Toolbox Bundle with lifetime licenses. This all-in-one bundle is perfect for upscaling and enhancing images and videos, background removal, media conversion, downloading, and more (and it’s currently over 62% off the standard price!).
Just bear in mind that this offer is only good for a limited time, so to take advantage of the huge discount, make sure you act fast!
How to enhance your images with Aiarty
Aiarty Image Enhancer includes tools for a wide array of image improvements. In this section, I share a step-by-step tutorial so you can see just how easy it is to upscale a photo to 8K or more (even while improving sharpness and removing image noise).
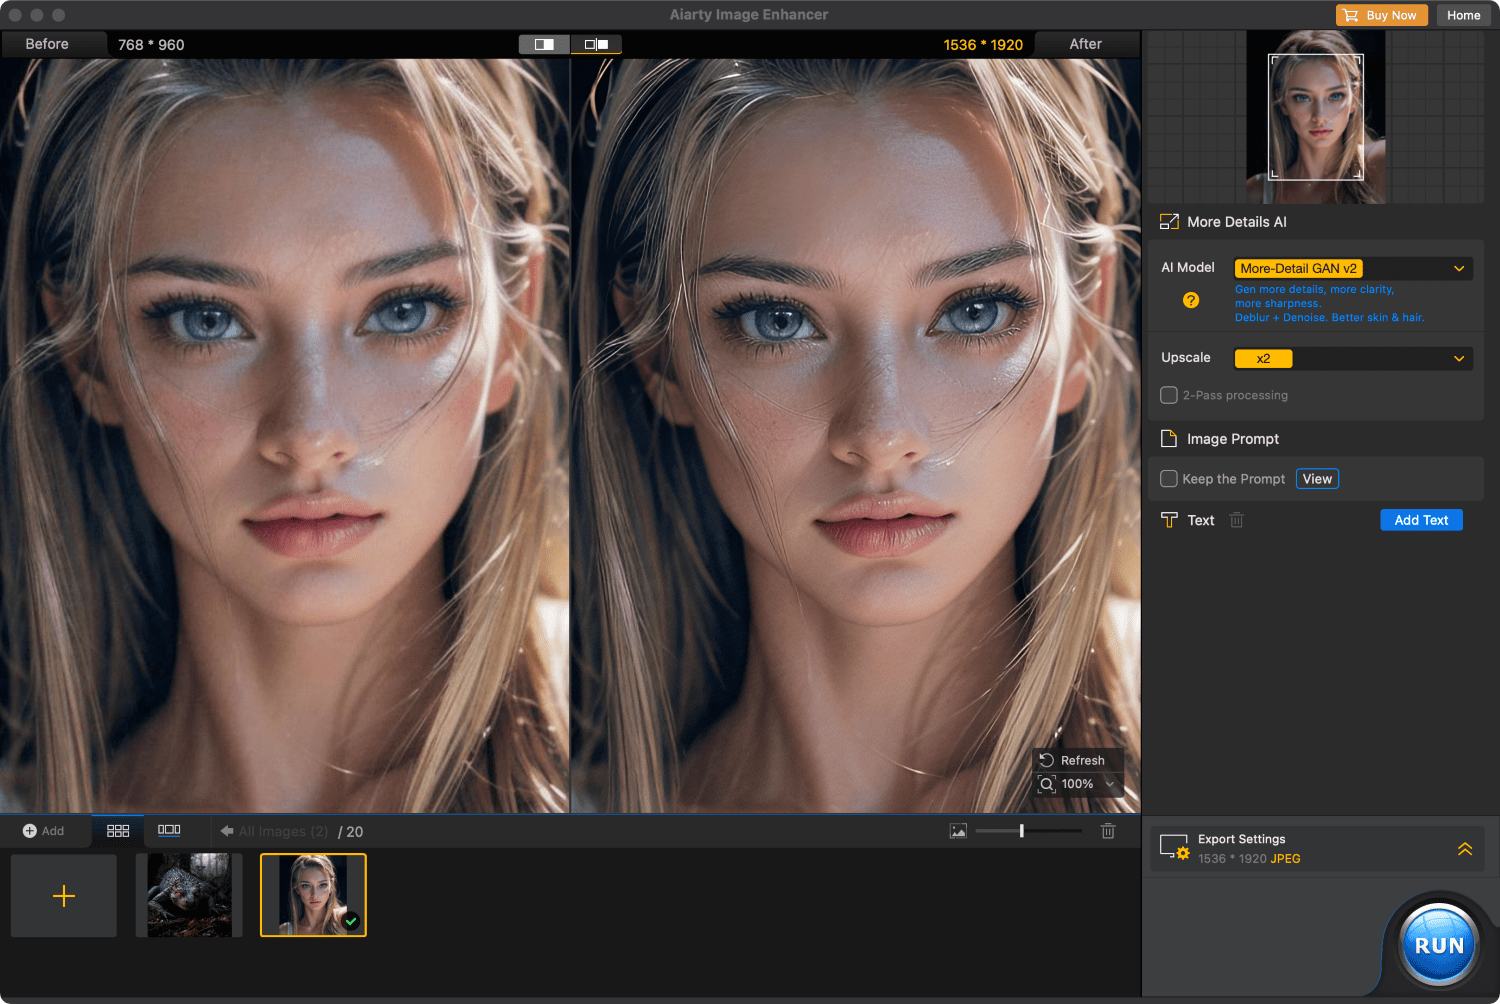
When you first open the Aiarty Image Enhancer, you’ll see a modern-looking interface, with the preview screen in the center and the image-enhancement tools on the right-hand side:
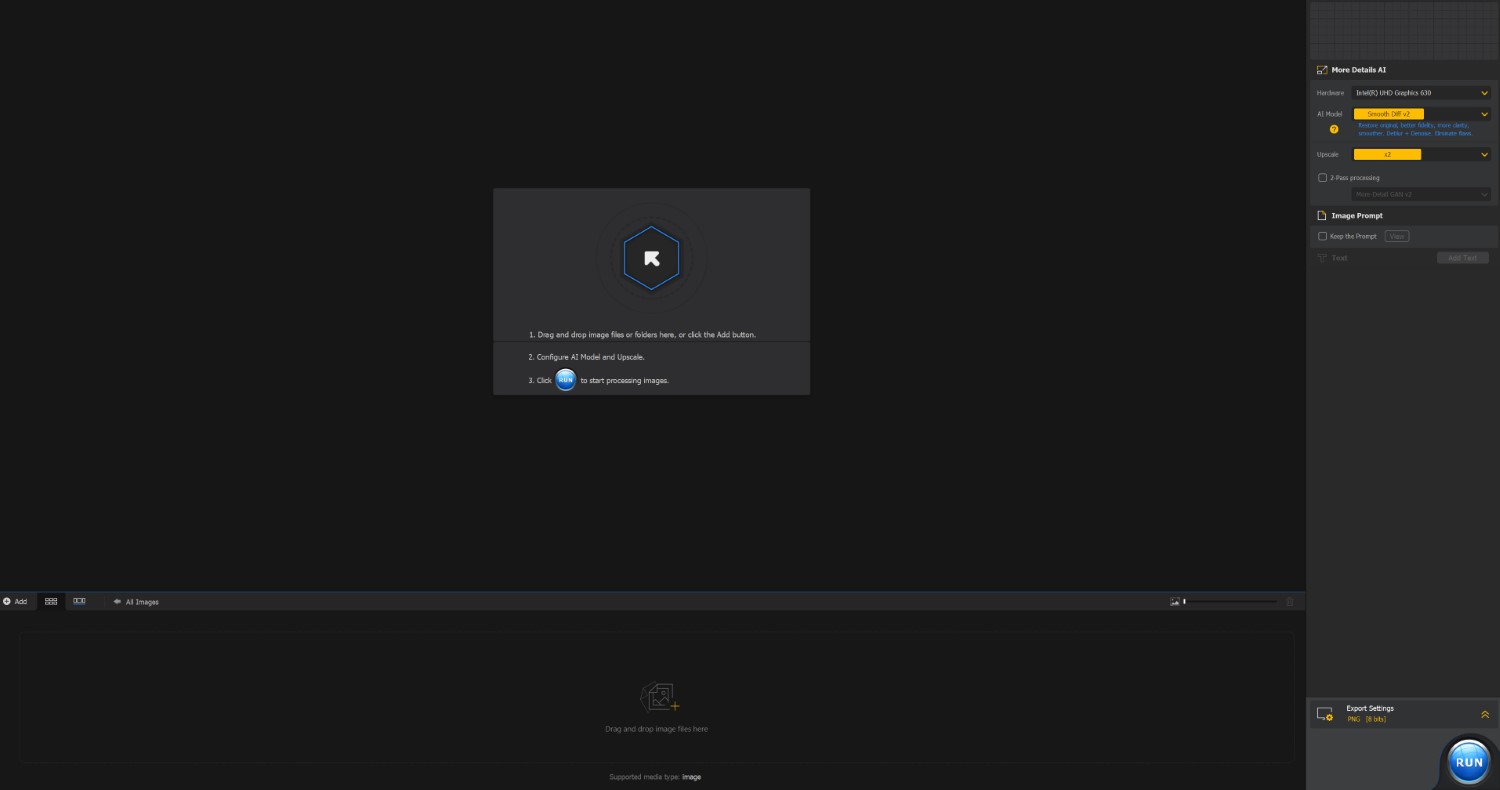
To get started, you can simply drag and drop an image file onto the main window, or you can click the arrow button at the center of the screen and select the file you want to upscale. (You also have the option to import multiple files, which comes in handy when you need to enhance a batch of photos.)
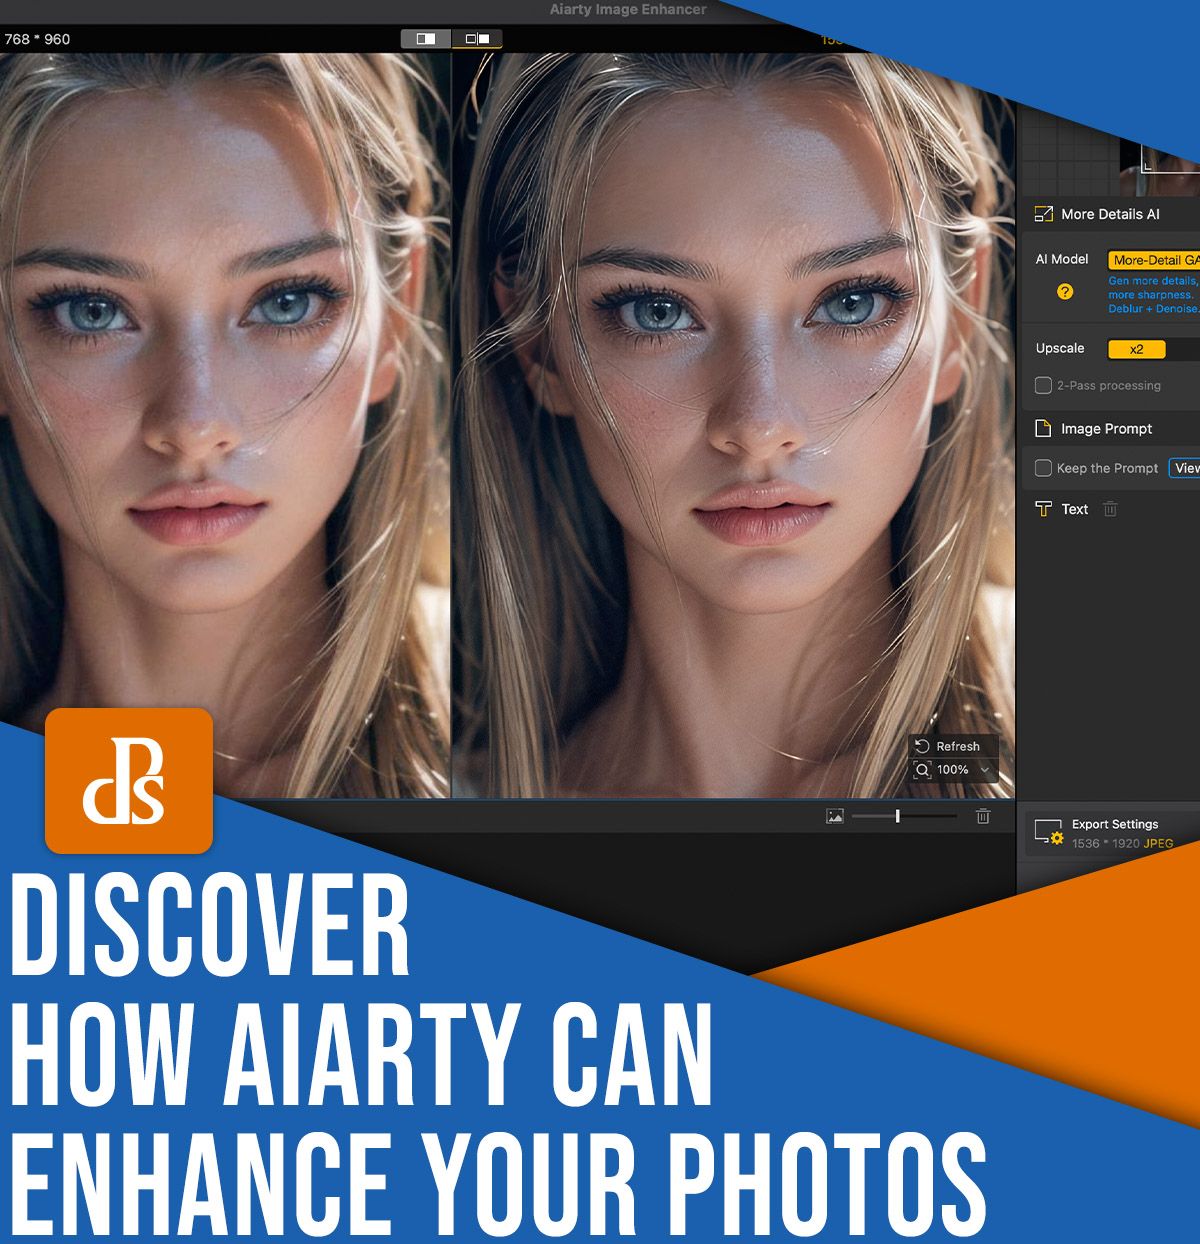
Your selected image will appear in the preview window, with the option to toggle between two different before-and-after views:
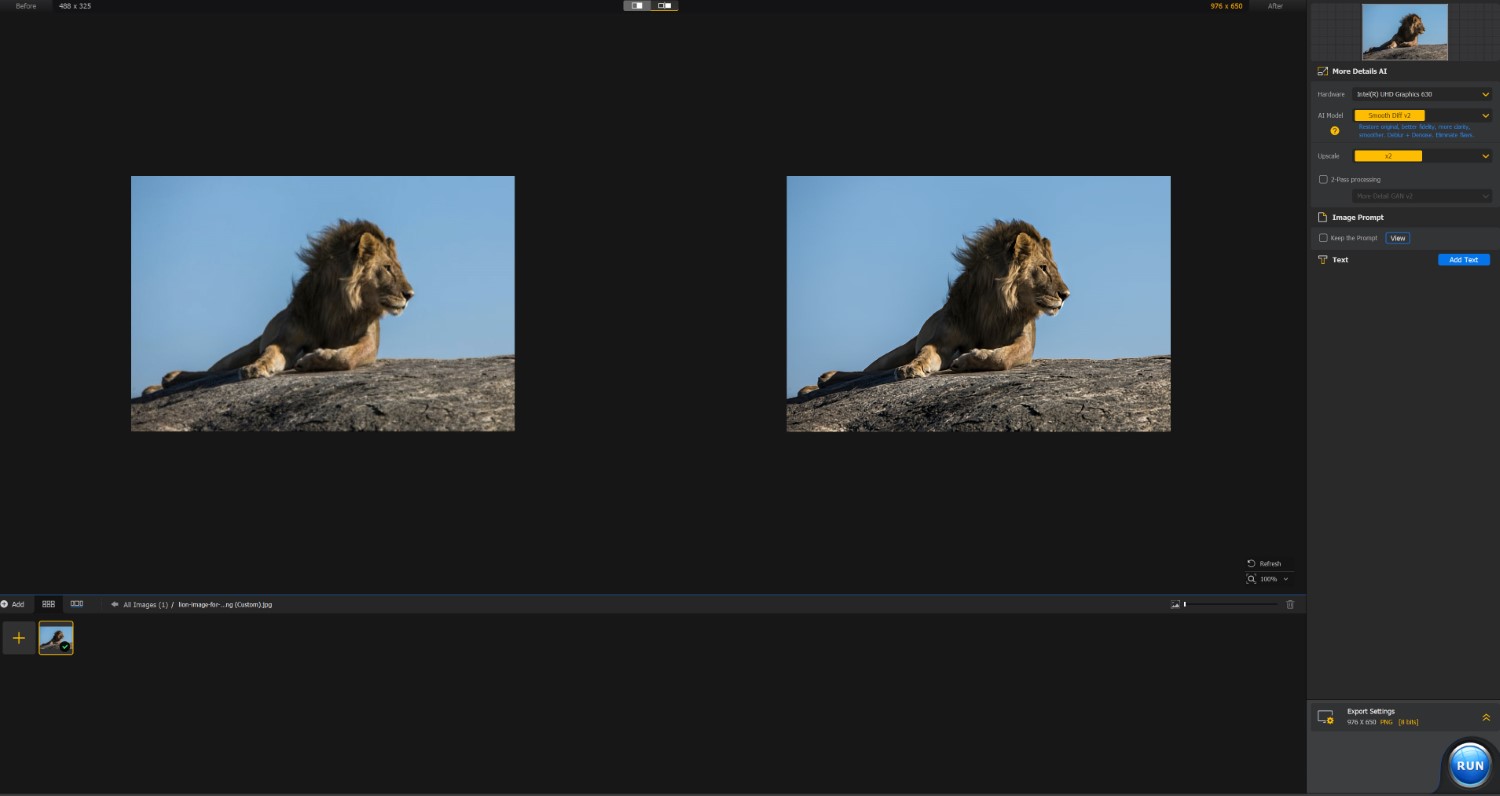
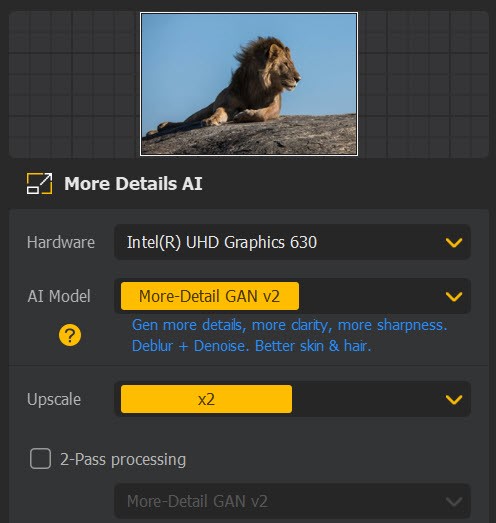
Once Aiarty has loaded the AI models and analyzed your file, it’s time to choose your upscaling settings. Under the More Details AI tab, you’ll need to choose an AI model as well as an upscaling option:
Picking an upscaling option is easy: Just choose the option that corresponds to your desired file resolution. If you want to upscale your file to 8K, for instance, then simply select the 8K setting.
That said, the AI model you choose can constrain your upscaling options, so you must pick carefully.
How do you select an AI model? Well, Aiarty currently offers three:
- More-Detail GAN v2, which generates additional detail, adds clarity and sharpness, and applies deblurring and denoising. This model offers upscaling up to 32K.
Best for: Skin, hair, pores, and other intricate patterns.
- Smooth Diff v2, which restores missing detail and handles file flaws, including noise and blur. This model also offers upscaling up to 32K.
Best for: 2D graphics, some faces, glass surfaces, smooth textures, anime, and line art.
- Real-photo v3, which only offers up to 2X upscaling but restores files with beautiful, photo-realistic detail.
Best for: Family portraits, product shots, and scenic landscapes.
Each model has its strengths and weaknesses, and I encourage you to try them all. However, if you’re looking for a quick rundown of the models’ practical uses, the More-Detail GAN v2 is best for major image upscaling (especially where fine detail is required), while the Real-Photo v3 is ideal for removing flaws (such as noise or blur) without significant upscaling. The Smooth Diff v3 can also restore flawed image files, but it generally performs better on non-photo-realistic images (i.e., drawings and graphics).
For the purposes of my 8K upscale example, I’m going to use the More-Detail GAN v2, since my image – a wildlife portrait – includes lots of detail that requires enhancing.
(Note: If you decide to switch the AI model after importing an image, it’s a good idea to press the Refresh button on the preview screen so you can see an accurate preview of your enhanced result!)
At this point, you can simply choose your export settings (including file format, quality level, and output path), then press the Run button:
And Aiarty will get to work generating your enhanced image!
I do want to offer a couple more tips, however.
First, if you’re looking for top-notch image quality, I encourage you to choose the 2-Pass Processing option, which tells the software to run the image-enhancement model a second time.
Second, if you’re enhancing an AI-generated image, and you want the program to take into account the prompt you initially used to generate that image, be sure to check the Keep the Prompt box in the Image Prompt tab.
Key Aiarty Image Enhancer features
At this point, you should be relatively familiar with the power of Aiarty’s software. However, I’d like to offer a final rundown of the main features so you can understand the overall value of the program.
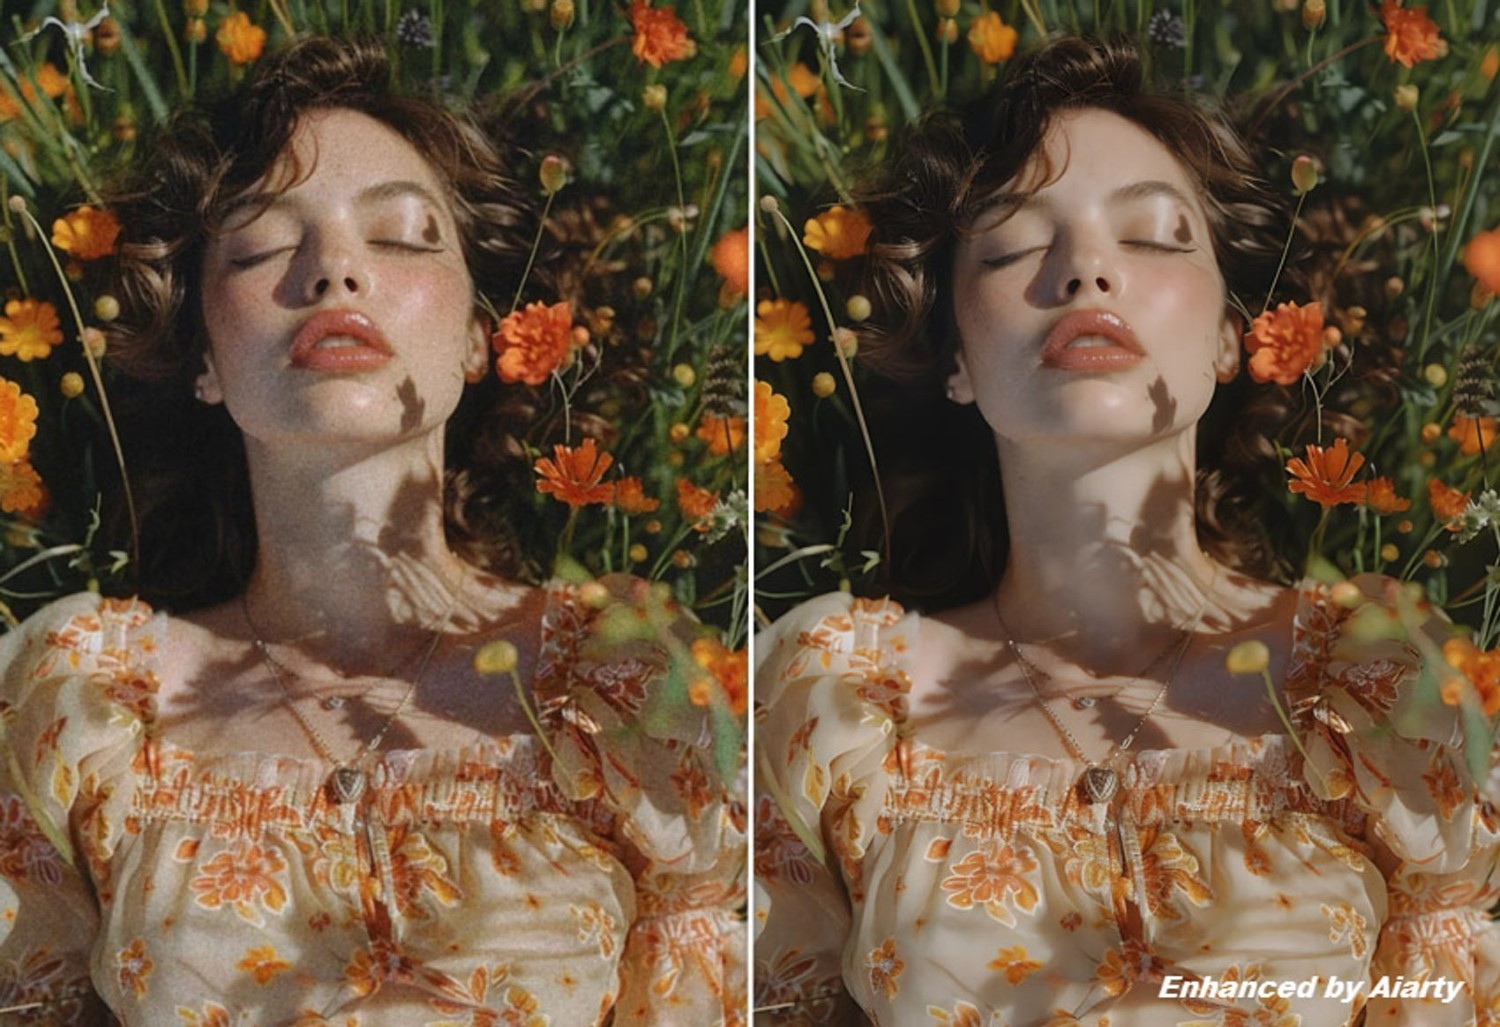
First, the program’s AI-powered denoising technology allows photographers to remove unsightly noise from images that were captured in low-light conditions (e.g., indoors, at night) or using high ISOs. Unlike traditional denoising algorithms, Aiarty’s AI models do an excellent job of removing noise while preserving image details (and even while upscaling!).
Second, Aiarty’s deblur technology can take even the softest, out-of-focus image and generate a sharp, realistic result. It’s a great way to handle blur due to subject motion, but it also excels at correcting for cheap optics and poor focusing in the field. Plus, deblurring allows photographers to enhance compressed images and even AI-generated images!
Similarly, the More-Detail GAN v2 model does a stellar job of preserving existing elements while also creating beautifully detailed skin, texture, hair, and more.
And the More-Detail GAN v2 model, as well as the Smooth Diff v2 model, are capable of magnificent upscaling – not just to 4K and 8K resolutions, but all the way up to 32K, allowing you to produce gorgeous image files perfect for gallery display and even for wall-sized prints.
Of course, I would be remiss not to mention the flexibility and power offered by Aiarty’s three separate AI models. You can easily switch between the three options to tailor the output to your desired result, and you can even try 2-pass processing for even more outstanding files.
Final words
At the end of the day, Aiarty offers a cutting-edge product that can help pretty much any photographer. The combination of three AI models and flexible upscaling options ensure that you have a powerful solution to address a wide array of image-quality issues, while the one-click approach and intuitive interface make the program perfect for beginners to professionals.
So if you’re looking to enhance your photos but you’re not sure where to turn, consider Aiarty Image Enhancer! And remember that for a few more days, you can purchase an annual or lifetime license at a huge discount – so head over to the Aiarty website and download your copy today!
(You can also check out the Aiarty store for some great holiday packages!)
Digiarty Software is a paid partner of dPS.